Wednesday, 7 May 2014

Post Week

Post Week

I've learnt I love polenta. I love its texture and its ability to take on flavours. I find it's a perfect accompaniment for so many dishes, especially those which come in red! It's great smooth and it's great when it's solidified.

I followed Chef John's instructions on the cooking of polenta. That's another thing I love, Chef John!! I've been following him on youtube for quite some time and always look forward to a new video! <3 Chef John. He's informative, inspiring and has a terrible sense of humour! Ticks all the boxes for me!

So with this polenta I made various red sauces. Some from tomato and some from Capsicum (Bell Pepper). Capsicum being a treat as it is quite expensive!

  • I cooked 3 cheap sausages, then chopped them up and cooked them a little more to crisp them on all sides, while reserving 1/2 a sausage to cool down for my mini foxy Jasper!
  •  When the sausages are well done I turned the stove to low and added in some onion and a pinch of salt (to help sweat the onion) 
  • Once onion is nicely sweated I add in 2 cloves of finely diced garlic, 1tsp cumin powder, 1 tsp coriander powder, 2tsp freshly ground black pepper,  1tsp garlic powder (depends on strength of brand) pinch of dried thyme and a pinch of mixed dried herbs and cook till fragrant.

At this stage the sauce may vary from a tomato based to a capsicum based one. For tomato;

  • Add 1/2 tsp minced garlic, 1tsp minced chilli, 1tsp tomato paste. mix thoroughly. Cook till paste takes on a semi sweet smell. (5 to 10 mins)
  • Add in 1 can of chopped tomatos (I like cans of whole tomatos that I chop myself for more flavour) mix well and adjust seasoning to taste.
  • Cook down till wateryness is gone.
  • server over polenta.
  • mmm Polenta.

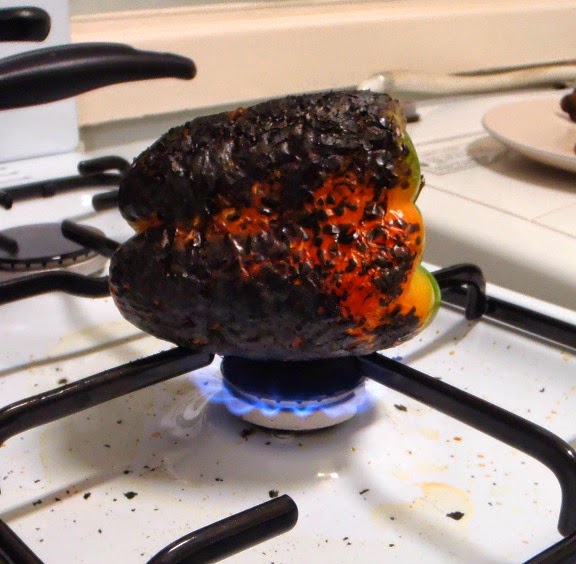
For a capsicum based red sauce things get a little trickier. Roasted capsicums are much nicer than fried ones in these sorts of dishes as they give another level of "heartiness", a slightly smokey, sweeter flavour to the sauces. So firstly one must prepare the capsicums. Since I have a gas stove I followed these instructions by Laura Vitale, till she cut them up, then I went off on my own and my instructions are as follows;

 The roasting of a capsicum

After having just added your spices to the dry pan you must now make the sauce and that begins with a salsa.
  
Salsa pre-stickblender
  • Chop up 2 roasted capsicums, 1 small finely diced onion, 1 stock cube, 1tsp freshly ground black pepper and using a stick blender, blend till smaller chunks. Taste and adjust for seasoning.
  • Add to pan and cook till wateryness is gone
  • serve over polenta what i did was mix in some boiled then panfried and crisped-up potato cubes! om nom nom!

  
Capsicum, sausage and potatoes. It may not look pretty but it certainly tasted it!

Sausages in a tomato based sauce on creamy polenta.

With the left over polenta, the next night I made pan fried polenta. Once it has solidified, as all polentas will it is easily sliced. then i coated it in flour
Polenta cut and floured.

Then to pan fry, I spray then pan with cooking spray and fried them, never looking away! and they did fall apart, but ohh how I did love them!
And to serve I made a red sauce with the sausages as above although instead of the capsicum or tomato recipes, I added 1/2 a jar of salsa that needed to be used and it all turned out rather well! i was quite pleased and I'm looking forward to my next polenta adventures!

Pan fried polenta with sausage and salsa!

I also made a Croque Monsieur which was really rather nice! My husband did indeed quite like it! 
Tuesday, 29 April 2014

Up and Over the Countryside

We were called to help some family members tow their caravan from Bendeela reserve campground (45mins away, near Kangaroo Valley, NSW on the South Coast of Australia) to home as their breaks weren't up to it and lucky for them the trusty 4x4 was ready and willing as were we (my husband and I) always right to go for a nice drive! We headed off early and I didn't get many photos as I always love morning drives due to the colours being amazing! The photos I did capture were taken from the moving 4x4 as we were towing on the way back so there is often some movement in them.

To begin with when we were getting ready to set off Jasper the puppy (who is actually just over 6 years old) was being very cute and warranted a few photos! Although he does always seem to know when the camera is going to go off and he moves! I think he may be a little camera shy!


Along Moss Vale Road, up the Kangaroo Valley Pass


On the Kangaroo Valley Pass looking down over Kangaroo Valley


Looking towards the Fitzroy Falls Reservoir

Wildes Meadow


Robertson


At the top of Macquarie Pass we waited for a large coach to pass a few bends called the "hairpins" these are particularly bad corners for large vehicles, and small for that matter! Rather notorious! We were lucky enough to have installed a CB radio a few months ago and it comes in very handy when towing up and down Macquarie Pass to know when to wait a minute so as to not get caught with trucks or other large vehicles around these bends or tight passages! Its helped on several occasions on Macquarie Pass alone!

The view while waiting at the top of the Hairpins on Macquarie Pass

Coming down Macquarie Pass, the one image that turned out...kinda

And at the bottom of the pass...

Then off home to clean... and post this... and now play a video game :D

Monday, 28 April 2014

The Follow Up

My husband returned with the milk. Hray! Which means I was able to do experiment with a roux based Cheesy Scallion Dip and the method goes as such (or at least vaguely):

Cheesy Scallion Dip:

INGs:
2 garlic cloves
1 very small onion (or 1/4 of an onion) very finely diced
1 Tbsp butter
1/4 cup flour
1 cup milk
1/4 cup scallions finely sliced
1 cup reduced fat tasty cheese finely grated
cracked pepper
salt

  • Firstly  preheat the oven to 160C and leaving the skins on the garlic cloves wrap them in foil (I used baking paper as I had no foil and it worked fine) and place them in the oven while prepping the onion and cheese and waste a bit of time.  
  • Remove garlic from oven and either squish it out of its skin or if you were to impatient like I was and the didn't roast long enough, simply dice it very very small. 
  • Place onion and garlic in a pan and saute till they become transparent and floppy. Set onion and garlic aside.
  • To make the Roux, in a thick bottomed sauce pan, on low heat, place the butter, and once melted add in the flour until the butter and flour mixture balls up and crumbles, if it doesn't, add a little more flour. Stir constantly for a couple of minutes allowing the "flouryness" to cook out a little.
  • Now little by little add in the milk. Its good to use a whisk here but you don't have to, I don't have one and it ends up smoothing out once the milk heats through and you squash the larger flour balls against the sides of the pan with the back of the spoon. Keep adding milk till you make it a little runnier than the desired consistency (we still need to add the cheese and that will thicken it a little!)
  • Once relatively smooth continue stirring and add in pepper and salt to taste as well as the garlic, onions, scallions and cheese. Mix well till the cheese melts and thickens the mixture
  • and hope that you haven't forgotten anything!

Great with crunchy toast!

Serve Hot!!!! Om nomnomnom

Sunday, 27 April 2014

The First One


So as I was debating as to what was going to be my first post I went back to the reason I began one this very day. I happened to be doing some experimental cooking, as I have want to do, and I ended in an text conversation with a friend about my experimental cooking and that various people I know would like to see what I "create" and a blog would be a good idea. I also thought this might be a bit fun. I've been told for a long time to make a blog but I have put it off and put it off and now things seem to be settling down a bit it seems a much more suiting time, and much like so many of the other homemakers on the Earth I decided to make a blog to log my doing and goings on, or maybe it will just be a clog like so many of those other would be blogs. A blogger that makes a blog and blogs for a week or two then forgets about it is called a "clogger", I can see myself being one of those...

I thought I would post this one a bit later when my recipe would be complete but sadly the day is slowly dripping away and my husband has not yet returned with the milk for which I need in the next step! A Cheesy Scallion Dip!

Garlic Parmesan Pepper Crouton Fingers sans the Cheesy Scallion Dip

I don't really do recipes so i cant really say the exact times etc but it basically goes as such:

INGS: stale bread
           garlic powder
           salt
           cracked pepper
           cooking spray
           the horrible cheap packet Parmesan cheese
  • Preheat over to 200C
  • Spray Baking pan with cooking oil.
  • Cut old Bread into fingers.
  • Spray one side of bread and coat with garlic powder, salt, Parmesan and cracked pepper.
  • Flip the bread over onto tray and spay that side of bread with cooking spray.
  • Coat with garlic powder, salt, cracked pepper and Parmesan.
  • Bake till not bendy and nice and brown.